Introduction to Windows Controls

Introduction to Windows Controls
Introduction to the Picture Box
Overview
You can display a picture directly on a form. Still, to give you a more comfortable space to show a picture, the .NET Framework provides a class named PicturePox and a Windows control of the same name.
Like most controls, to get a picture box, from the Toolbox, you can click the PictureBox button and click the form. To programmatically get the control, you can declare a variable of the PictureBox class.
![]() Practical Learning: Introducing the Picture Box
Practical Learning: Introducing the Picture Box
New Instruction:From now on, in our lessons, to ask you to create a new project, we may instruct you to "Create a new Windows Forms application named ..." or "Create a new Windows Forms project named ..." or "Start a new Windows Forms application/project named ...". In that case, follow the above instructions and name the project with the indicated name. |
Introduction to the Characteristics of a Picture Box
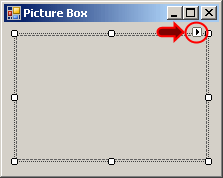
As a regular visual control, after a picture box has been added to a form, it assumes a default size (unless you dragged and drew when adding it). You can then move or resize it using the techniques of application design we reviewed. Of course, you can also specify the location and the size of the control programmatically. Here is an example:
The Border Style of a Picture Box
By default, when you have added a picture box to a form, it appears without borders. At run time, the form designer would show the borders so you can conveniently move or resize it:

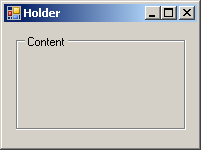
At run time, unless you display an object in the picture box or draw a shape in it, the user would not know where the picture box starts and where it ends:
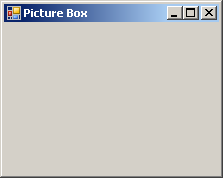
There is no way of knowing that the above form contains a picture box. If you want the picture box to show its borders to the user, you can use the BorderStyle property
The Image of a Picture Box
As stated in the introduction, the primary purpose of a picture box is to display a picture. At design time, to specify the picture that this control would hold, first click the picture box on the form to select it:
In both cases, a dialog box would come up to assist you with locating and selecting a picture.
The Image Location of the Image of a Picture Box
Besides the PictureBox.Image property, to assist you with specifying the image to display, the PictureBox class provides a property named ImageLocation. This property, which is of type String, expects either the path to the file or the URL of the image. At design time, difference with the Image property is that you are not asked to selected a picture but to give its location. Therefore, to use it, in the Properties window, type the complete path. You can also provide a URL to the picture.
At run time, you can also specify the path or the URL to the picture by assigning it to the PictureBox.ImageLocation property.
After you have specified the image that the picture box would display, by default, it is located from the top-left corner of the control.
The picture box can show only as far as its size. In some cases, you want to resize either the picture to fit the control, or the control to fit the picture.
The Size Mode of a Picture Box
The SizeMode property of the PictureBox class allows you to specify how the image in the control would be displayed. This property is based on the PictureBoxSizeMode enumeration and its members are as follows: Normal, CenterImage StretchImage, Zoom, AutoSize
![]() Practical Learning: Introducing the Size Mode of a Picture Box
Practical Learning: Introducing the Size Mode of a Picture Box
Introduction to the Group Box
Description
A group box is a window that draws a bordered line all around. This makes it draw a limiting placeholder for other controls. To indicate what it is used for, a group box may display a title, also referred to as its caption. Here is an example of a group box on a form:
Group Box Creation
To support group box, the .NET Framework provides a class named GroupBox. At design time, to add a group box to your application, from the Containers section of the Toolbox, click GroupBox and click the form (or another container). To programmatically create a group box, declare a variable of type GroupBox and allocate memory for it using the new operator.
The Caption of a Group Box
As you can see from the above picture, a group box may or may not display a caption. If you need to display a caption on it, at design time, in the Properties window, click Text and type a string. To do this programmatically, assign a string to the Text property of the group box control. Here is an example:
private void InitializeComponent()
{
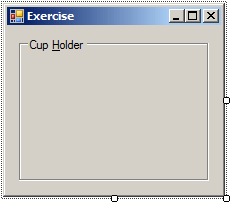
GroupBox grpHolder = new GroupBox();
grpHolder.Left = 22;
grpHolder.Top = 18;
grpHolder.Width = 120;
grpHolder.Height = 58;
grpHolder.Text = "Cup Holder";
}
The Group Box as a Container
Besides serving a delimiter of an area on a form, a group box can also serve as a container. That is, a group box can carry or hold other controls. When you add a control to a group box, the location you specify is relative to the group box and not to the form. Because the group box will act as the parent, it is its client area that is considered for the location of its child(ren) control(s).
Using a Mnemonic
As mentioned already, a group box can be equipped with a caption, which is created by assigning a string to its Text property. A mnemonic is a character (or a letter) that the user can use to access a group box. To create a mnemonic, precede one character (or one letter) of its caption with &. Here is an example:
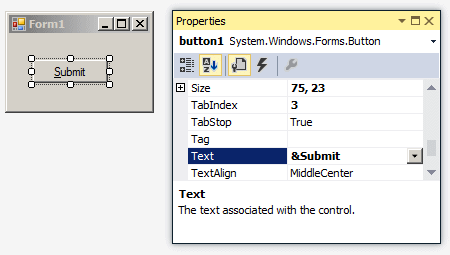
Using the mnemonic, the user can press Alt and the underlined character to give focus to a control inside the group box.
Introduction to the Combo Box
Overview
A combo box is a control that holds a list of items, usuaally some strings. A combo box appears as a text box with an arrow on its right side. To use a combo box, the user clicks the arrow of the combo box. This would display a list of items. The user can then select from that list.
Creating a Combo Box
To support combo boxes, the .NET Framework provides a class named ComboBox. To visually create a combo box, in the Common Controls section of the Toolbox, click the ComboBox button and click a form or another container.
Introduction to the Items of a Combo Box
There are various ways you can add items to a combo box. The easiest way is to do this visually. After adding a ComboBox object from the Toolbox to a form:
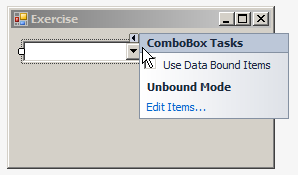
Any of these actions would display a dialog box:
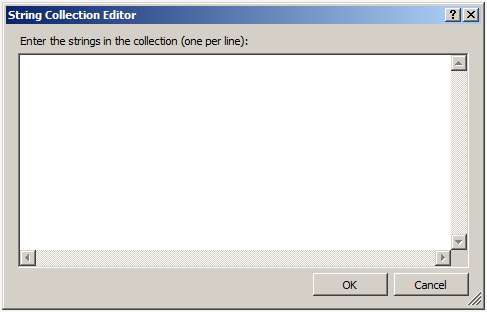
To add an item to the combo box, type it in the large text box. To another item, press Enter and type. After adding the items, click OK.
One of the characteristics of the combo box is that its holds strings. In fact, by default, a combo box displays a string item. As mentioned already, to use a combo box, the user can display the list of the combox and select an item. After making the selection, the combo box displays the item the user had selected. To support this, the ComboBox class is equipped with the Text property. Therefore, to find out the item the user had selected, get the value of the ComboBox.Text property.
Message Boxes
Introduction
A message box is a special dialog box used to display a piece of information to the user. As opposed to a regular form, the user cannot type anything in the dialog box. To support message boxes, the .NET Framework provides a static class named MessageBox. Besides this, you can also use functions from either the Visual Basic language or the Win32 library.
If you want to use the Visual Basic language to display a message box, first add a reference of the Microsoft.VisualBasic.dll to your project (to the References node of the Solution Explorer). To support message boxes, the Visual Basic language provides a function named MsgBox that is a member of the Interaction class.
The Return Value of a Message Box
The primary purpose of a message box is to display a message. Besides displaying a message, a message box may let the user make a decision by clicking a button. Depending on the button the user would have clicked, the message box would return a value. The value returned by a message box corresponds to the particular button the user would have clicked (on the message box). The return values of a message box are defined in an enumeration named DialogResult. The buttons and the returned values are as follows:
| If the User Clicks | The method Returns |
| DialogResult.Abort | |
| DialogResult.Cancel | |
| DialogResult.Ignore | |
| DialogResult.No | |
| DialogResult.OK | |
| DialogResult.Retry | |
| DialogResult.Yes |
The Interaction.MsgBox() function of the Visual Basic language returns a member of an enumeration named MsgBoxResult.
The Message of a Message Box
The .NET Framework provides the MessageBox static class to easily create a message box. To display a simple message with just an OK button, you can call its static Show() method. Its syntax is as follows:
public static DialogResult MessageBox.Show(string message);
In this case, the message to display must be passed as a string to the Show() method. Here is an example:
using System.Windows.Forms;

public class Exercise
{
    static int Main()
    {
        MessageBox.Show("Welcome to the Wonderful World of C# programming");
        return 0;
    }
}
This would produce:
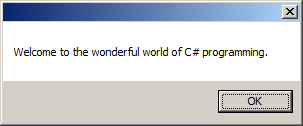
The message to display can be made of up to 1024 characters. To display the message on multiple lines, you can use the new line escape sequence anywhere inside the string.
Here is the Visual Basic version of the above code:
using Microsoft.VisualBasic;

public class Exercise
{
    static void Main()
    {
        Interaction.MsgBox("Welcome to the wonderful world of C# programming.");
    }
}
The Caption of a Message Box
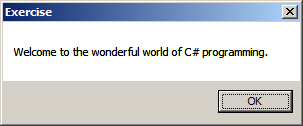
The MessagBox.Show() method is overloaded with various versions. Another version uses the following syntax:
public static DialogResult Show(string text, string caption);
This version allows you to specify a custom caption for the message box. With this version, the first argument is the string that the user will see displaying on the message box. You can pass it as a string. You can also create it from other pieces of strings.
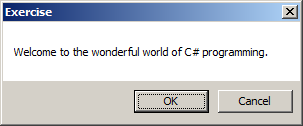
The second argument, caption, will be the sentence to display in the title bar of the message box. Here is an example:
using System.Windows.Forms;

public class Exercise
{
    static void Main()
    {
        MessageBox.Show("Welcome to the wonderful world of C# programming", "Exercise");
    }
}
This would produce:
The Visual Basic version of the above code is:
using Microsoft.VisualBasic;

public class Exercise
{
    static void Main()
    {
        Interaction.MsgBox("Welcome to the wonderful world of C# programming.", 0, "Exercise");
    }
}
The Buttons of a Message Box
Another version of the MessageBox.Show() method uses the following syntax:
public static DialogResult Show(string text, string caption, MessageBoxButtons buttons);
This version allows you to display one or more buttons on the message box. The available buttons are defined through an enumeration named MessageBoxButtons. In the Visual Basic language, the buttons of the message box are controlled by an enumeration named MsgBoxStyle. In the Visual Basic language, the buttons of the message box are controlled by an enumeration named MsgBoxStyle. The members of these enumerations are:
| MessageBoxButtons | MsgBoxStyle | Message Box Buttons | |
| OK | OKOnly | 0 | |
| OKCancel | OKCancel | 1 | |
| YesNo | YesNo | 4 | |
| YesNoCancel | YesNoCancel | 3 | |
| RetryCancel | RetryCancel | 5 | |
| AbortRetryIgnore | AbortRetryIgnore | 2 | |
To use any of these combinations of buttons, call the MessageBoxButtons enumeration and access the desired combination. Here is an example:
using System.Windows.Forms;

public class Exercise
{
    static int Main()
    {
        MessageBox.Show("Welcome to the wonderful world of C# programming",
                        "Exercise",
                        MessageBoxButtons.OKCancel);
        return 0;
    }
}
This would produce:
The Icon of a Message Box
This version allows you to display an icon. The possible icons are available through the MessageBoxIcon enumeration. The members of this enumerator are:
| MessageBoxIcon | Description | |
| None | ||
| Asterisk | ||
| Error | ||
| Exclamation | ||
| Hand | ||
| Information | ||
| Question | ||
| Stop | ||
| Warning | ||
Here is an example:
public class Exercise
{
    static void Main()
    {
        MessageBox.Show("Your order appears to be correct" +
                        "\nAre you ready to provide your credit card information?",
                        "Customer Order Processing",
                                              MessageBoxButtons.YesNoCancel,
                                              MessageBoxIcon.Information);
    }
}
This would produce:
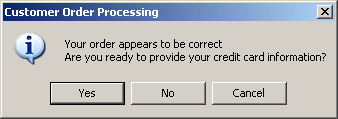
The Default Button of a Message Box
When a message box is configured to display more than one button, the operating system is set to decide which button is the default. The default button has a thick border that sets it apart from the other button(s). If the user presses Enter, the message box would behave as if the user had clicked the default button. If the message box has more than one button, you can decide what button would be the default. To specify the default button, the MessageBox.Show() method provides the following version:
public static DialogResult Show(string text,
                                string caption,
                                MessageBoxButtons buttons,
                                MessageBoxIcon icon,
                                MessageBoxDefaultButton defaultButton);
Based on this, you can specify the default button using the last argument that provides values through the MessageBoxDefaultButton enumerator whose values are:
Button1: The left button will be the default. Here is an example:
public class Exercise
{
    static void Main()
    {
	    MessageBox.Show("Your order appears to be correct" +
                        "\nAre you ready to provide your credit card information?",
		                "Customer Order Processing",
                        MessageBoxButtons.YesNoCancel,
			            MessageBoxIcon.Information,
                        MessageBoxDefaultButton.Button1);
    }
}
This would produce:
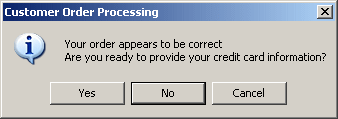
Button2: If the message box displays two buttons, the right button will be the default. If the message box displays three buttons, the middle button will be the default. Here is an example:
public class Exercise
{
    static void Main()
    {
       	MessageBox.Show("Your order appears to be correct" +
                        "\nAre you ready to provide your credit card information?",
	                    "Customer Order Processing",
                        MessageBoxButtons.YesNoCancel,
			            MessageBoxIcon.Information,
                        MessageBoxDefaultButton.Button2);
    }
}
This would produce:
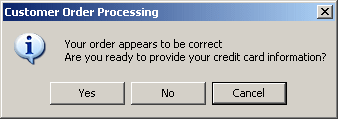
Button3: The right button will be the default. Here is an example:
public class Exercise
{
    static int Main()
    {
       	MessageBox.Show("Your order appears to be correct" +
                        "\nAre you ready to provide your credit card information?",
	                    "Customer Order Processing",
                        MessageBoxButtons.YesNoCancel,
			            MessageBoxIcon.Information,
                        MessageBoxDefaultButton.Button3);
    }
}
This would produce:
The Visual Basic's Input Box
Introduction
The Visual Basic language provides a function that allows you to request information from the user who can type it in a text field of a dialog box. The function used to accomplish this is called InputBox and its basic syntax is:
public static string InputBox(string Prompt,
                              string Title = "",
                              string DefaultResponse = "",
                              int XPos = -1,
                              int YPos = -1);
Presenting the Message
The most basic piece of information you can provide to the InputBox() function is referred to as the prompt. It should be a string that the user will read and know what you are expecting. Here is an example:
using Microsoft.VisualBasic;
public class Exercise
{
static void Main()
{
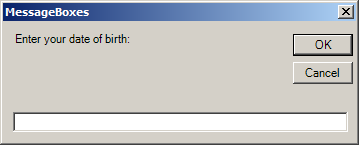
Interaction.InputBox("Enter your date of birth");
}
}
This would produce
Upon reading the message on the input box, the user is asked to enter a piece of information. The type of information the user is supposed to provide depends on you, the programmer. Therefore, there are two important things you should always do. First you should let the user know what type of information is requested. Is it a number (what type of number)? Is it a string (such as the name of a country or a customer's name)? Is it the location of a file (such as C:\Program Files\Homework)? Are you expecting a Yes-No/True-False type of answer (if so, how should the user provide it)? Is it a date (if it is a date, what format is the user supposed to enter)? These questions mean that you should state a clear request to the user and specify what kind of value you are expecting. For example, instead of the question above, you can implement the InputBox() function as follows:
using Microsoft.VisualBasic;
public class Exercise
{
static void Main()
{
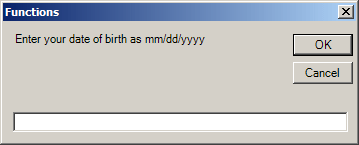
Interaction.InputBox("Please enter your date of birth as mm/dd/yyyy");
}
}
This would produce:
Another solution, also explicit enough, consists of providing an example to the user.
The Caption of an Input Box
The second argument to the InputBox() function allows you to optionally specify the title of the input box. This is the string that would appear on the title bar. Since this is an optional argument, if you don't pass it, the input box would display the name of the application. Otherwise, to display your own title bar, pass the Title argument.
The title is passed as a string. Here is an example:
using Microsoft.VisualBasic;
public class Exercise
{
static void Main()
{
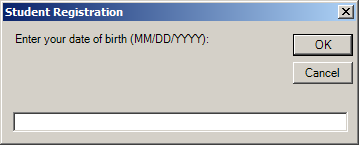
Interaction.InputBox("Enter your date of birth (MM/DD/YYYY):", "Student Registration");
}
}
This would produce:
The caption can also be a string created from an expression or emanating from a variable or value.
The Default Value of an Input Box
Sometimes, even if you provide an explicit request, the user may not provide a new value but click OK. The problem is that you would still need to get the value of the text box and you may want to involve it in an expression. You can solve this problem and that of providing an example to the user by filling the text box with a default value. To support this, the InputBox() function provides the third argument.
To present an example or default value to the user, pass a third argument to the InputBox() function. If you want to use this argument to provide an example the user can follow, provide it with the right format. Here is an example:
using Microsoft.VisualBasic;

public class Exercise
{
    static void Main()
    {
        Interaction.InputBox("Enter Student Name:",
                             "Student Registration", "John Doe");
    }
}
Here is an example of running the program:
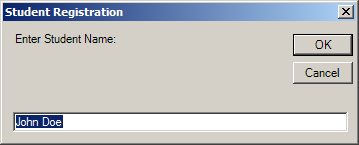
Notice that, when the input box displays with a default value, the value is in the text box and the value is selected. Therefore, if the value is fine, the user can accept it and click OK.
The Location of the Input Box
By default, when the input box comes up, it displays in the middle of the screen. If you want, you can specify where the input box should be positioned when it comes up. To assist you with this, the InputBox() function is equipped with a fourth and a fifth arguments. The fourth argument specifies the x coordinate of the input box; that is, the distance from its left border to the left border of the monitor. The fifth argument specifies the distance from the top border of the input box to the top border of the monitor.
The Return Value of an Input Box
When the input box displays, after typing a value, the user would click one of the buttons: OK or Cancel. If the user clicks OK, you should get the value the user would have typed. It is also your responsibility to find out whether the user typed a valid value. Because the InputBox() function can return any type of value, it has no mechanism of validating the user's entry. To get the value of the input box when the user clicks OK, you can get the returned value of the InputBox() function.
After being used, the InputBox() function returns a string. Here is an example of getting it:
using Microsoft.VisualBasic;
using System.Windows.Forms;

public class Exercise
{
    static void Main()
    {
        string strStudentName = Interaction.InputBox("Enter Student Name:",
                                                     "Student Registration", "John Doe");

        MessageBox.Show(strStudentName,
                        "Student Registration",
                        MessageBoxButtons.OK,
                        MessageBoxIcon.Information);
    }
}
The Environment Class
Introduction
The .NET Framework provides a static class named Environment. This class quickly and easily gives some information about the application that is currently running and some objects you can use in your application. The Environment class is defined in the System namespace. This means that you don't have to do anything to access it, since it is automatically available whenever you create a C# application.
Getting the Machine Name
It used to be difficult to know the name of the computer on which your application is running. To let you easily get this information, the Environment class provides a property named MachineName.
Get the Operation System's Version
To assist you with knowing the version of the operating system on which the application is running, the Environment class provides the OSVersion property.
This corresponds to Microsoft Windows 7.
Getting the Current User's name
At any time, if you want to know the user name of the person who is currently using your application, you can get the value of the UserName property of the Environment class.
The Microsoft Windows operation system is usually installed on the C: drive with most of its drivers in a folder named System32 that is located either under Windows or WinNT. This full path of the driver's main folder is referred to as the system directory.
Getting the System Directory
To assist you with finding out the path to the system directory, the Environment class is equipped with a property named SystemDirectory.
![]() Practical Learning: Ending the Lesson
Practical Learning: Ending the Lesson
|
|
||
| Previous | Copyright © 2001-2021, FunctionX | Next |
|
|
||