
Introduction to Strings
|
|
Introduction to Strings |
The Message Box
Introduction
A message box is a relatively small window that displays a piece of information to the user. As opposed to a regular form, the user cannot type anything in the message box. There are usually two kinds of message boxes you will create: one that simply displays information and one that expects the user to make a decision.
The function to create a message box is named MsgBox. Its syntax is:
MsgBox([Message] [Buttons] [Title] [HelpFile] [Context])
The MsgBox() function takes five arguments and only the first one is required: the Message.
 Practical
Learning: Starting Microsoft Access
Practical
Learning: Starting Microsoft Access
The Message of a Message Box
The Message argument is the text that will display on the message box. As a string, you can display it in double quotes.
![]() Practical
Learning: Introducing Message Boxes
Practical
Learning: Introducing Message Boxes
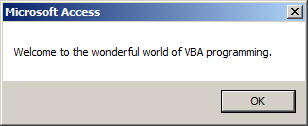
Private Sub Command0_Click()
    MsgBox "Welcome to the wonderful world of VBA programming."
End Sub
Private Sub Command0_Click()
    MsgBox "Your logon credentials have been checked." & _
            vbCrLf & "To complete your application, please " & _
            "fill out the following survey"
End Sub

The Buttons on a Message Box
The Buttons argument specifies what button(s) should display on the message box. There are different kinds of buttons available and Visual Basic recognizes them by a numeric value assigned to each. The Buttons argument is a value of the VbMsgBoxStyle enumeration. It can be one of the following members or constants:
| VbMsgBoxStyle Member | Constant Value | Button(s) Displayed |
| vbOKOnly | 0 |
|
| vbOKCancel | 1 |
|
| vbAbortRetryIgnore | 2 |
|
| vbYesNoCancel | 3 |
|
| vbYesNo | 4 |
|
| vbRetryCancel | 5 |
|
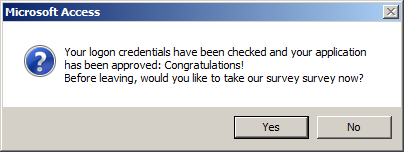
Based on what we learned about enumerations, you can use the name of the member of the VbMsgBoxStyle enumeration directly, that is, without qualifying it. Here is an example:
Private Sub cmdMessageBox_Click()
    MsgBox "Your logon credentials have been checked " & _
           "and your application has been approved: Congratulations!" & _
           vbCrLf & "Before leaving, would you like " & _
           "to take our survey survey now?", _
           vbYesNo
End Sub
We also learned that you can use the constant value of the member of the enumeration if you know it. Here is an example:
Private Sub cmdMessageBox_Click()
    MsgBox "Your logon credentials have been checked " & _
           "and your application has been approved: Congratulations!" & _
           vbCrLf & "Before leaving, would you like " & _
           "to take our survey survey now?", 4
End Sub
![]() Practical
Learning: Using the Buttons on a Message Box
Practical
Learning: Using the Buttons on a Message Box
Private Sub Command0_Click()
    MsgBox "Your logon credentials have been checked " & _
           "and your application has been approved: Congratulations!" & _
           vbCrLf & "Before leaving, would you like " & _
           "to take our survey survey now?", _
           VbMsgBoxStyle.vbYesNo
End Sub

The Icons on a Message Box
Besides the buttons, to enhance your message box, you can display an icon in the left section of the message box. To display an icon, you can use a member of the VbMsgBoxStyle enumeration. The available members for the icons are:
| VbMsgBoxStyle Member | Integer Value | Description | |
| vbCritical | 16 |
|
|
| vbQuestion | 32 |
|
|
| vbExclamation | 48 |
|
|
| vbInformation | 64 |
|
|
To use one of these icons, you have two options. You can combine its VbMsgBoxStyle button with the VbMsgBoxStyle icon member. To perform this combination, you use the Or operator.
Once again, you can use the name of the member of the VbMsgBoxStyle enumeration without qualifying it. Here is an example:
Private Sub cmdMessageBox_Click()
    MsgBox "Your logon credentials have been checked " & _
           "and your application has been approved: Congratulations!" & _
           vbCrLf & "Before leaving, would you like " & _
           "to take our survey survey now?", _
           vbYesNo Or vbQuestion
End Sub
The second alternative it to use the integral constants instead of the members of the enumeration. Here is an example:
Private Sub cmdMessageBox_Click()
    MsgBox "Your logon credentials have been checked " & _
           "and your application has been approved: Congratulations!" & _
           vbCrLf & "Before leaving, would you like " & _
           "to take our survey survey now?", _
           4 Or 32
End Sub
Alternatively, you can add (using the arithmetic addition) the integral value of the button to the integral value of the icon. For example, the integral value of the Yes/No button is 4 and the integral value of the question icon is 32. If you add both, you get 4 + 32 = 36. Therefore, if you use 36 for the second argument, you would get the question icon, the Yes, and the No button. This would be done as follows:
Private Sub cmdMessageBox_Click()
    MsgBox "Your logon credentials have been checked " & _
           "and your application has been approved: Congratulations!" & _
           vbCrLf & "Before leaving, would you like " & _
           "to take our survey survey now?", 36
End Sub
![]() Practical
Learning: Showing Icons on a Message Box
Practical
Learning: Showing Icons on a Message Box
Private Sub Command0_Click()
    MsgBox "Your logon credentials have been checked " & _
           "and your application has been approved: Congratulations!" & _
           vbCrLf & "Before leaving, would you like " & _
           "to take our survey survey now?", _
           VbMsgBoxStyle.vbYesNo Or VbMsgBoxStyle.vbQuestion
End Sub
The Default Button of a Message Box
If you create a message box with more than one button, the most left button usually has a thick border, indicating that it is the default. If the user presses Enter after viewing the button, the effect would be the same as if she had clicked the default button. If you want, you can designate another button as the default. To do this, you can use one more member of the a member of the VbMsgBoxStyle enumeration. The available members are:
| VbMsgBoxStyle Member | Integral Constant | If the message box contains more than one button, the default would be |
| vbDefaultButton1 | 0 | The first button |
| vbDefaultButton2 | 256 | The second button |
| vbDefaultButton3 | 512 | The third button |
| vbDefaultButton4 | 768 | The fourth button |
Once again, to specify a default value, use the Or operator to combine a VbMsgBoxStyle Member with any other combination.
These additional buttons can be used to further control what the user can do:
| Constant | Value | Effect |
| vbApplicationModal | 0 | The user must dismiss the message box before proceeding with the current database |
| vbSystemModal | 4096 | The user must dismiss this message before using any other open application of the computer |
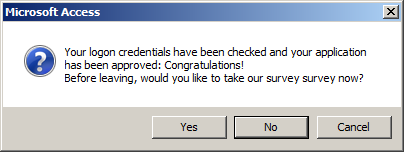
Once again, you can use the name of the member of the VbMsgBoxStyle enumeration directly without qualifying it. Here is an example:
Private Sub cmdMessageBox_Click()
    MsgBox "Your logon credentials have been checked " & _
           "and your application has been approved: Congratulations!" & _
           vbCrLf & "Before leaving, would you like " & _
           "to take our survey survey now?", _
           vbYesNoCancel Or vbQuestion Or vbDefaultButton2
End Sub
Also, remember that you can use the constant integer of a member. Here is an example:
Private Sub cmdMessageBox_Click()
    MsgBox "Your logon credentials have been checked " & _
           "and your application has been approved: Congratulations!" & _
           vbCrLf & "Before leaving, would you like " & _
           "to take our survey survey now?", _
           3 Or 32 Or 256
End Sub
You can also arithmetically add the constant values of the desired members.
![]() Learning: Considering the Default Button of a Message Box
Learning: Considering the Default Button of a Message Box
Private Sub Command0_Click()
    MsgBox "Your logon credentials have been checked " & _
           "and your application has been approved: Congratulations!" & _
           vbCrLf & "Before leaving, would you like " & _
           "to take our survey survey now?", _
           VbMsgBoxStyle.vbYesNoCancel Or VbMsgBoxStyle.vbQuestion _
           Or VbMsgBoxStyle.vbDefaultButton2
End Sub
The Title or Caption of a Message Box
The Title argument is the caption that would display on the title bar of the message box. It is a string whose word or words you can enclose between parentheses or that you can get from a created string. The Title argument is optional. As you have seen so far, if you omit the title, the message box uses a default one. Otherwise, if you want a custom title, you can provide it as the third argument to the MsgBox() function. The caption can be a simple string.
The title can also be a string created from an expression or from a variable or value.
![]() Learning: Considering the Default Button of a Message Box
Learning: Considering the Default Button of a Message Box
Private Sub Command0_Click()
    MsgBox "Your logon credentials have been checked " & _
           "and your application has been approved: Congratulations!" & _
           vbCrLf & "Before leaving, would you like " & _
           "to take our survey survey now?", _
           vbYesNoCancel Or vbQuestion Or vbDefaultButton2, _
           "Crofton Circle of Friends - Membership Application"
End Sub

Help for a Message Box
If your application is using a help file, you can specify this and let the message box use it. The HelpFile argument is a string that specifies the name of the help file, and the Context argument provides the number that corresponds to the appropriate help topic for the message box.
The Return Value of a Message Box
The MsgBox() function can be used to return a value. This value corresponds to the button the user clicks on the message box. Depending on the buttons the message box is displaying, after the user has clicked, the MsgBox() function can return one of the following values:
| If the user click | The function returns | Numeric Value |
|
|
vbOK | 1 |
|
|
vbCancel | 2 |
|
|
vbAbort | 3 |
|
|
vbRetry | 4 |
|
|
vbIgnore | 5 |
|
|
vbYes | 6 |
|
|
vbNo | 7 |
Here is an example:
Private Sub cmdMessage6_Click()
    Dim intResponse As Integer

    intResponse = MsgBox("Your printing configuration " & _
                         "is not fully set." & vbCrLf & _
                         "If you are ready to print, click" & vbCrLf & _
                         "(1) Yes: To print the document anyway" & vbCrLf & _
                         "(2) No: To configure printing" & vbCrLf & _
                         "(3) Cancel: To dismiss printing", _
                         vbYesNoCancel + vbInformation, _
                         "Critical Information")
End Sub
Fundamentals of Strings
Introduction to Strings
A string is one or a combination of characters. To support strings, the Visual Basic language provides the String data type and many accompanying functions. As seen in previous lessons, to declare a variable for a string, use the String data type. To initialize a string variable, put its value in double-quotes and assign it to the variable.
String Concatenation
String concatenation consists of adding one string to another. To support this operation, the Visual Basic language provides the & operator. The formula to follow is:
=Value1 & " " & Value2
Here are examples
=FirstName & " " & LastName
This would display, for example, Boniface Dunkirk
=[LastName] & ", " & [FirstName]
This would produce, for example, Chang, Helene
=[Address] & " " & [City] & " " &
      [State] & " " & [ZIPCode] & " " &
      [Country]
This would display a complete address in a field
To add a string to an existing string, add the new string to the first and assign the expression to the first string. You can use either the + or the & operator. Here is an example:
![]() Practical
Learning: Introducing Strings
Practical
Learning: Introducing Strings
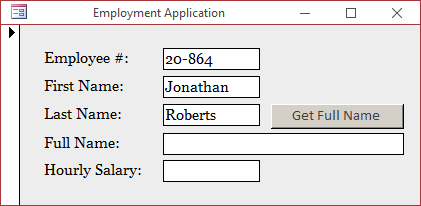
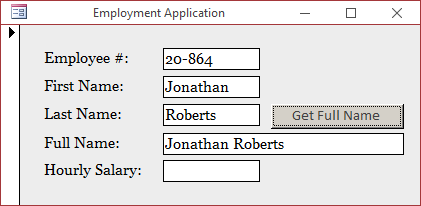
Private Sub cmdGetFullName_Click()
    Dim fullName As String

    fullName = txtFirstName
    fullName = fullName + " "
    fullName = fullName + txtLastName

    txtFullName = fullName
End Sub
One way you can initialize a string is to fill it up with a certain character of your choice. To let you do this, the Visual Basic language provides a function named String. Its syntax is:
String(number, character) As String
The second argument is a character you want to repeat in the string. The first argument to is the number of occurrences you want the second argument to be repeated. The String() function returns a String value. Here is an example:
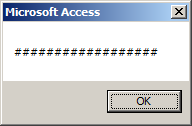
Private Sub cmdString_Click()
    Dim strValue As String

    strValue = String(18, "#")
    MsgBox strValue
End Sub
This would produce:
Introduction to Characters
The ASCII Character of a Number
To help you find the equivalent ASCII character of a number, the Visual Basic language provides a function named Chr. Its syntax is:
Public Function Chr(ByVal CharCode As Integer) As String
When calling this function, pass a small number as argument. Here is an example:
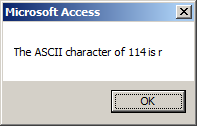
Private Sub cmdCharacter_Click()
    Dim Character
    Dim Number As Integer

    Number = 114
    Character = Chr(Number)

    MsgBox "The ASCII character of " & Number & " is " & Character
End Sub
This would produce:
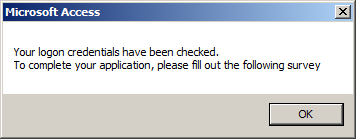
To create a new line in a string, such as a break in a message box, you can use the combination Chr(10) & Chr(13) between two strings. Here is an example:
Private Sub cmdMessageBox_Click()
    MsgBox "Your logon credentials have been checked." & _
            vbCrLf & "To complete your application, please " & _
            "fill out the following survey"
End Sub
This would produce:
The Wide ASCII Character of a Number
If you pass a number lower than 0 or higher than 255 to the Chr() function, you would receive an error. The reason you may pass a number higher than 255 is that you want to get a character beyond those of US English. To support such numbers, the Visual Basic language provides another version of the function named ChrW. Its syntax is:
Public Function ChrW(ByVal CharCode As Integer) As Char
The W here represents Wide Characters. This makes it possible to store the character in the memory equivalent to 2 bytes. Here is an example:
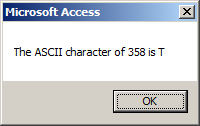
Private Sub cmdCharacter_Click()
    Dim Character
    Dim Number As Integer

    Number = 358
    Character = ChrW(Number)

    MsgBox "The ASCII character of " & Number & " is " & Character
End Sub
This would produce:
The Length of a String
The length of a string is the number of characters it contains. To assist you with finding the length of a string, the Visual Basic language provides a function named Len. Its syntax is:
Public Function Len(ByVal Expression As String) As Integer
This function expects a string as argument.
![]() Practical
Learning: Getting the Length of a String
Practical
Learning: Getting the Length of a String
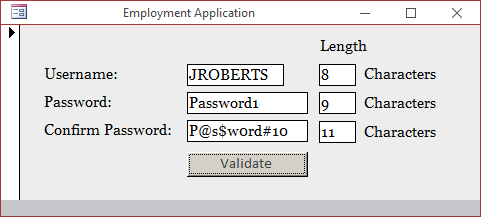
Private Sub cmdValidate_Click()
    txtUsernameLength = Len(txtUsername)
    txtPasswordLength = Len(txtPassword)
    txtConfirmPasswordLength = Len(txtConfirmPassword)
End Sub

Fundamental String Operations
In some other cases, you may work with a string that contains an empty space to its left or to its right. To let you remove all empty spaces from the left side of a string, the Visual Basic language provides the LTrim() function. Its syntax is:
LTrim(string) As String
To remove all empty spaces from the right side of a string, you can call the RTrim() function. Its syntax is:
RTrim(string) As String
To remove the empty spaces from both sides of a string, you can call the Trim() function. Its syntax is:
Trim(string) As String
On the other hand, if you want to include or add empty spaces in a string, you can call the Space() function. Its syntax is:
Space(number) As String
Because all these functions return a string, they can be written as LTrim$, RTrim$, Trim$, and Space$.
To compare two strings, you can call the StrCmp() function. Its syntax is:
StrComp(string1, string2, compare)
The first and the second arguments are strings and both are required. After the function has performed the comparison, it returns
The third argument allows you to specify the comparison in binary or text format. This argument can have one of the following values:
| Constant | Value | Description |
| vbBinaryCompare | 0 | Perform a binary comparison |
| vbTextCompare | 1 | Perform a textual comparison |
![]() Practical
Learning: Comparing Strings
Practical
Learning: Comparing Strings
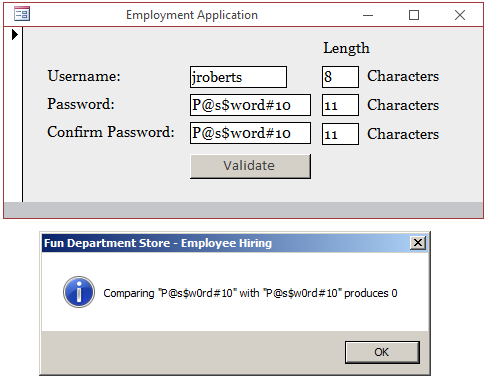
Private Sub cmdValidate_Click()
    Dim iComparisonValue As Integer

    txtUsernameLength = Len(txtUsername)
    txtPasswordLength = Len(txtPassword)
    txtConfirmPasswordLength = Len(txtConfirmPassword)

    iComparisonValue = StrComp(txtPassword, txtConfirmPassword, VbCompareMethod.vbTextCompare)

    MsgBox "Comparing """ & txtPassword & """ with """ & _
           txtConfirmPassword & """ produces " & CStr(iComparisonValue), _
           VbMsgBoxStyle.vbOKOnly Or VbMsgBoxStyle.vbInformation, _
           "Fun Department Store - Employee Hiring"
End Sub

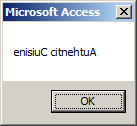
Once a string has been initialized, one of the operations you can perform on it consists of reversing it. To do this, you can call the StrReverse() function. Its syntax is:
StrReverse(string) As String
This function takes as argument the string that needs to be reversed. After performing its operation, the function returns a new string made of characters in reverse order. Here is an example:
Private Sub cmdCreate_Click()
    Dim strValue As String
    Dim strRev As String

    strValue = "Authentic Cuisine"
    strRev = StrReverse(strValue)

    MsgBox strValue
    MsgBox strRev
End Sub
This would produce:

Because the StrReverse() function returns a string, you can write it as StrReverse$.
The Character Cases of a String
Converting a String to Uppercase
To convert a lowercase character to uppercase, you can use the UCase() function. Its syntax is:
UCase(strValue As String) As String
When this function is called, each letter in uppercase would remain in uppercase. Each letter in lowercase would be converted to uppercase. Each non-letter character of the argument would not be converted. This function returns a string value. Here is an example:
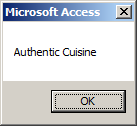
Private Sub cmdString_Click()
    Dim strValue As String

    strValue = "Authentic Cuisine"
    MsgBox strValue
    strValue = UCase(strValue)
    MsgBox strValue
End Sub
This would produce:
Because the UCase() function returns a string, you can also write it as UCase$.
Converting a String to Lowercase
To convert a string to lowercase, you can call the LCase() function. Its syntax is:
LCase(strValue As String) As String
This takes one argument as the string to convert. Any letter in lowercase in the argument would remain in lowercase. Any letter in uppercase would be converted to lowercase. The non-letter characters of the argument would be kept “as-isâ€.
Since the LCase() function produces a string, you can also write it as LCase$.
![]() Practical
Learning: Comparing Strings
Practical
Learning: Comparing Strings
Private Sub cmdValidate_Click()
    Dim iComparisonValue As Integer

    txtUsernameLength = Len(txtUsername)
    txtPasswordLength = Len(txtPassword)
    txtConfirmPasswordLength = Len(txtConfirmPassword)

    txtUsername = LCase$(txtUsername)

    iComparisonValue = StrComp(txtPassword, txtConfirmPassword, VbCompareMethod.vbTextCompare)

    MsgBox "Comparing """ & txtPassword & """ with """ & _
           txtConfirmPassword & """ produces " & CStr(iComparisonValue), _
           VbMsgBoxStyle.vbOKOnly Or VbMsgBoxStyle.vbInformation, _
           "Fun Department Store - Employee Hiring"
End Sub
Conversion to Appropriate Case
The LCase$() and the UCase$() functions are used to process the whole string. An alternative to these two functions consists of calling the StrConv() function. Its syntax is:
StrConv(string, conversion As vbStrConv, LocalID As Long) As String
This function takes two required arguments. The first argument is the string that will be considered for conversion. The second argument allows you to specify how the conversion would be performed. This argument can have one of the following values:
| Constant | Value | Description |
| vbUpperCase | 1 | Converts the lowercase letters of the string to uppercase |
| vbLowerCase | 2 | Converts the uppercase letters of the string to lowercase |
| vbProperCase | 3 | Converts the first letter of every word of the string to uppercase |
| vbWide | 4 | Converts narrow (single-byte) characters in string to wide (double-byte) characters |
| vbNarrow | 8 | Converts wide (double-byte) characters in string to narrow (single-byte) characters |
| vbKatakana | 16 | For Japan, converts Hiragana characters in string to Katakana characters |
| vbHiragana | 32 | For Japan, converts Katakana characters in string to Hiragana characters. |
| vbUnicode | 64 | Converts the string to Unicode using the default code page of the system. |
| vbFromUnicode | 128 | Converts the string from Unicode to the default code page of the system |
Here is an example:
Private Sub cmdCreate_Click()
    Dim strValue As String
    Dim strConversion As String

    strValue = "authentic cuisine"
    strConversion = StrConv(strValue, vbProperCase)

    MsgBox strValue
    MsgBox strConversion
End Sub
Practical
Learning: Ending the Lesson
|
|
||
| Previous | Copyright © 2002-2022, FunctionX, Inc. | Next |
|
|
||