-
Start Microsoft Word
-
On the main menu, click Tools -> Mail Merge...
-
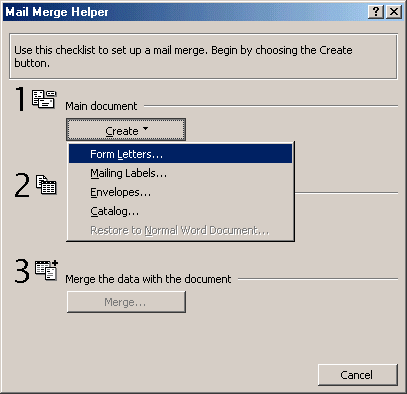
From the Mail Merge Helper, click Create -> Form
Letters...
-
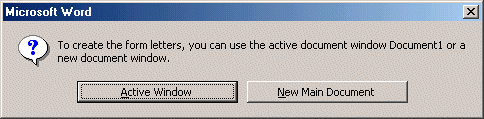
From the Microsoft Word dialog, click New Main Document
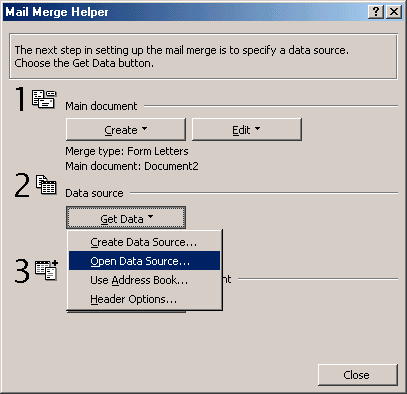
From the Mail Merge Helper again, click Get Data and
click Open Data Source...
From the Open Data Source dialog, click the arrow of
the Files Of Types combo box and select MS Access Databases. Using the Look In
combo box, locate the folder where the exercise files were installed, it
should be C:\My Documents\Mail Merge Files
Click Grier Summer Camp
-
Click Open.
-
From the Microsoft Access dialog, click tblMembers

-
And click OK.
-
Now Microsoft Word would like you to create the
letter.
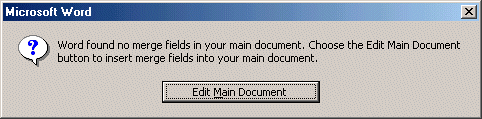
Click Edit Main Document
-
Now we will create the main letter.
Since in the beginning we decided to create a New Main Document, you
should have two instances of Microsoft Word running. From the Taskbar,
click the other instance of Microsoft Word, it might display Document1 -
Microsoft Word.
-
On the main menu, click File -> Open...
-
Locate the C:\My Documents\Mail Merge Files folder
-
Click MS Access Letter1, then click Open. That opens the document we
will use.
-
On the main menu, click Edit -> Select All.
-
On the main menu again, click Edit -> Copy
-
From the Taskbar, click the instance of Microsoft
Word that is holding our mail merge process.
-
On the main menu, click Edit -> Paste. After the
letter has been pasted, all we have to do now is to edit the document
for our mail merge.
-
Press Ctrl + Home to get to the beginning of the
letter.
-
Double-click Date to highlight it.
-
On the main menu, click Insert -> Date and
Time...
-
From the Date And Time dialog, click the 3rd date

-
And click OK
-
Highlight CI.
-
On the Mail Merge toolbar, click Insert Merge Field
-> EmergncyTitle
-
Press Space and click Insert Merge Field ->
EmergncyName
-
Press Enter and click Insert Merge Field ->
Address
-
Press Enter and click Insert Merge Field -> City
-
Press Space and click Insert Merge Field -> State
-
Press Space and click Insert Merge Field ->
ZIPCode
-
Press Space and click Insert Merge Field ->
Country

-
Click on the right side of Dear
-
Click Insert Merge Field -> EmergncyTitle
-
Press Space and click Insert Merge Field ->
EmergncyName
-
In the paragraph that follows, double-click CHILD to
highlight it.
-
Click Insert Merge Field -> FirstName
-
Press Space and click Insert Merge Field ->
LastName
-
In the paragraph that follows, highlight CHILD.
-
Click Insert Merge Field -> FirstName
-
In the paragraph that follows, double-click CAMP.
-
Click Insert Merge Field -> CampSelected. Make
sure you have some space between CampSelected and camp.
-
In the same paragraph, double-click CHILD
-
Click Insert Merge Field -> FirstName
-
Click in the empty cell on the right side of
Registration Date:
-
On the Mail Merge toolbar, click Insert Merge Field
-> RegistDate
-
Click on the right side of Registration #:
-
On the Mail Merge toolbar, click Insert Merge Field
-> RegistrationNumber
-
Click in the empty cell on the right side of Member
Name:
-
On the Mail Merge toolbar, click Insert Merge Field
-> FirstName
-
Press Space and click Insert Merge Field ->
LastName
-
Click in the empty cell on the right side of Contact
Information:
-
On the Mail Merge toolbar, click Insert Merge Field
-> Address
-
Press Enter and click Insert Merge Field -> City
-
Press Space and click Insert Merge Field -> State
-
Press Space and click Insert Merge Field ->
ZIPCode
-
Press Space and click Insert Merge Field ->
Country
-
Click in the empty cell on the right side of
Emergency Contact:
-
On the Mail Merge toolbar, click Insert Merge Field
-> EmergncyTitle
-
Press Space and click Insert Merge Field ->
EmergncyName
-
Click on the right side of Phone #:
-
On the Mail Merge toolbar, click Insert Merge Field
-> EmergncyPhone
-
Click in the empty cell on the right side of Health
Issues:
-
On the Mail Merge toolbar, click Insert Merge Field
-> HealthIssues
-
Click in the empty cell on the right side of
Hobbies:
-
On the Mail Merge toolbar, click Insert Merge Field
-> Hobbies
-
Click in the empty cell on the right side of Camp
Selected:
-
On the Mail Merge toolbar, click Insert Merge Field
-> CampSelected
-
Click in the empty cell on the right side of Start
Date:
-
On the Mail Merge toolbar, click Insert Merge Field
-> StartDate
-
Click on the right side of End Date:
-
On the Mail Merge toolbar, click Insert Merge Field
-> EndDate
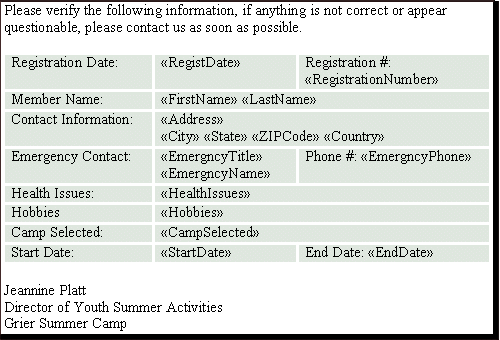
-
To read the letter as merge with a Microsoft Access
database table, on the Mail Merge toolbar, click View Merged Data.
-
Use the navigation buttons to review all the letters
with each recipient.

