-
Start Microsoft Word
-
From the main menu, click Tools -> Mail Merge…
-
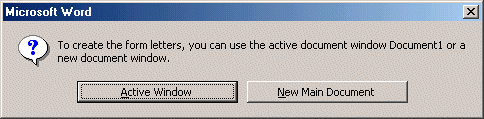
From the Mail Merge Helper dialog, click Create -> Form Letters…
-
Click Active Window
-
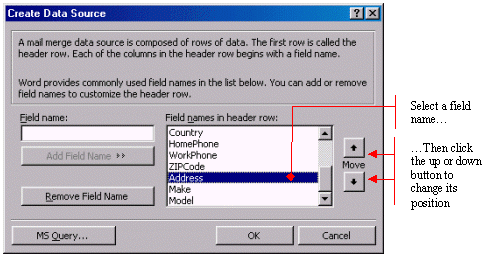
Click Get Data -> Create Data Source…
-
In the Field Names In Header Row list, click Address1 to select
it
-
Click Remove Field Name
-
Press the right arrow key to position the mouse at the end of
Address1
-
Press Backspace to remove 1 and click Add Field Name. That inserts the Address field in the
list.
-
In the Field Names In Header Row list, click Address2 and click Remove Field
Name
-
In the Field Names In Header Row list, click PostalCode and click Remove
Field
-
In the Field Name, select Postal and type ZIP so that when you finish, you will have
ZIPCode
-
While ZIPCode is highlighted in the Field Name: box, click Add Field
Name
-
In the Field Name: box, type Make and click Add Field
Name
-
In the Field Name, type Model and click Add Field
Name
-
Remove the HomePhone and Country fields from the Field
Names In Header Row list.
-
To move an item in the list, first click it; then use the arrow of the Move section to move it up or down. For example, in the Field Names In Header Row, click Address to select
it.
-
Click the up arrow above Move to move it up.
-
Rearrange items so that when you finish, the list will be as follows: Title, FirstName, LastName, JobTitle, Company, WorkPhone, Address, City, State,
ZIPCode, Make,
Model
-
When the list is ready, click OK.
-
Before continuing, Microsoft Word would like you to save the data structure you have just
created.
-
On the Save As dialog, click the Create New Folder
button.
-
Type Sales Contacts and press Enter.
-
If you are using Microsoft Word 2000, the new folder
should be displaying in the Save In combo box. If you are using Microsoft
Word 97, double-click the Sales Contacts folder to display it in the Save In
combo box.
-
In the File Name, type Valuable Car Customers
-
Click Save
-
We have just created a structure for our database. Now Microsoft Word needs to know where the originating data is located. Since we don't have any data available at this time, we will create a few records of the car dealer
customers
Click Edit Data Source

-
Type Mrs. Press Enter
-
Type Josiane and press Enter
-
Type Ndolo and press Enter
-
Type NetAdmin and press Tab
-
Type Crocodile Resources, Inc. and press Tab
-
Type (202) 439-4428 and press Tab
-
Type 9404 Georgia Ave Ste 402 and press Enter
-
Type Silver Spring and press Enter
-
Type MD and press Enter
-
Type 20905 Enter Lincoln
Enter Continental Enter
-
Enter the other records
-
When you have finished, click OK.
-
Now is the time to read the
letter.

